
There’s no easier way to make fresh artisan bread at home than this Dutch Oven Bread recipe. Baking the simple 4-ingredient, no knead dough in a dutch oven gives you soft on the inside, crunchy on the outside bread each and every time.
Did you know that you can make artisan bread that’s fluffy on the inside and crispy and crunchy on the outside in the comfort of your own home WITHOUT getting your hands messy? Well, you can and it’s so easy!
This no knead Dutch Oven Bread recipe is foolproof, heavenly, and will make your home smell amazing! It’s made with a simple 4-ingredient dough and after one 2 hour rise (yep, the dough only goes through ONE rise!), it’s ready to be popped into the dutch oven.
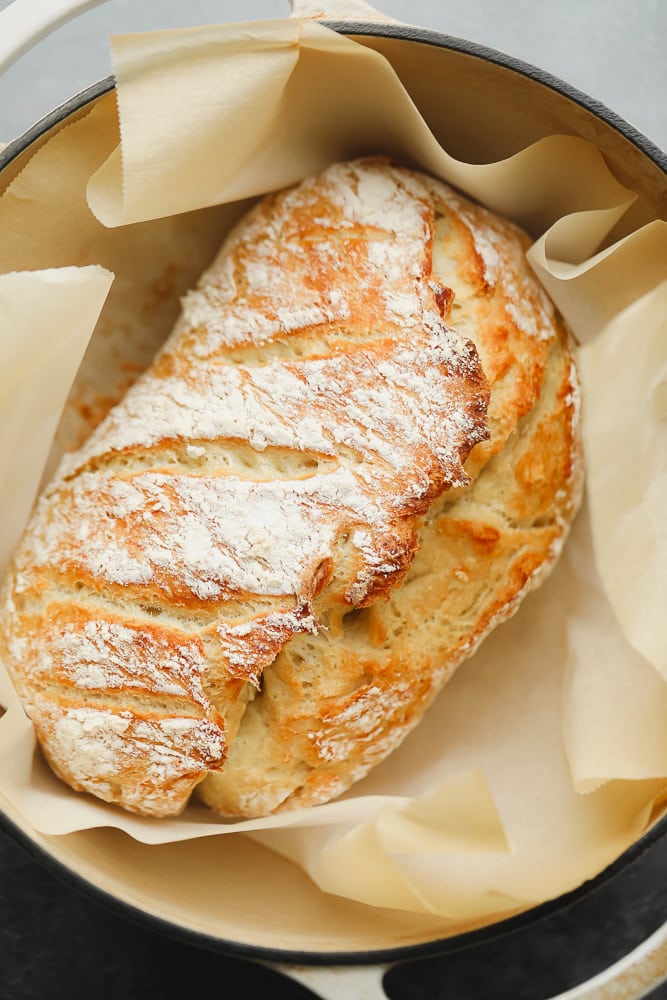
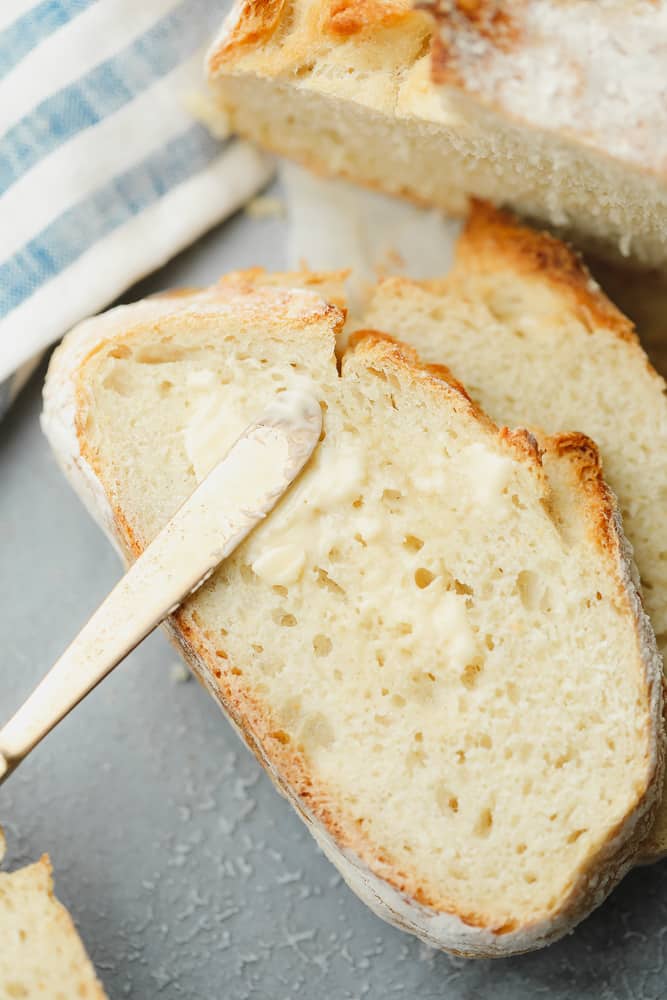
Baking bread in a dutch oven is the best way to make an artisan loaf that’s super soft inside and crunchy and golden brown on the outside.
Tear off a big chunk to dip in Butternut Squash Soup or a hearty Vegan Stew, or just slather some with Vegan Butter! You can make this for dinner tonight!
What size dutch oven do I need?
I love my dutch oven for food like chili, soups, biscuit pot pie and more. I highly recommend getting one if you don’t own one already! Some brands are super expensive, but I’ve had my trusty Lodge Enameled Cast Iron Dutch Oven for years, and it’s never let me down.
6 quart is the best size, but this bread will likely work in one a bit smaller, a 4.5 quart size. But I wouldn’t go any smaller than that. If you have a larger one, that’s fine as well.
Ingredients needed (with substitutions)
- All purpose flour – A simple all purpose flour will still give you perfectly fluffy and soft bread. You can use bread flour if you want or a 1:1 mix of whole wheat and all purpose flour instead. Sorry, I’ve never tried it gluten free! But go make this Gluten Free Artisan Bread from The Loopy Whisk instead.
- Salt – For flavor.
- Instant yeast – Unlike active dry yeast, instant yeast doesn’t need to be proofed before it’s used. Make sure it’s fresh and not expired so your bread can fluff up. You can use regular active yeast if needed, but the bread will need to rise a bit longer.
- Warm water – Test the temperature of the water with your wrist. If it feels a bit too hot for your wrist, it’s perfect to use for the yeast. If you have a thermometer, the water should measure 100ºF. Any hotter than 110ºF and it will kill the yeast.
How to make dutch oven no knead bread
Find the complete recipe with measurements below.
No knead bread dough is probably the easiest you’ll ever make. It comes together by hand in just one bowl:
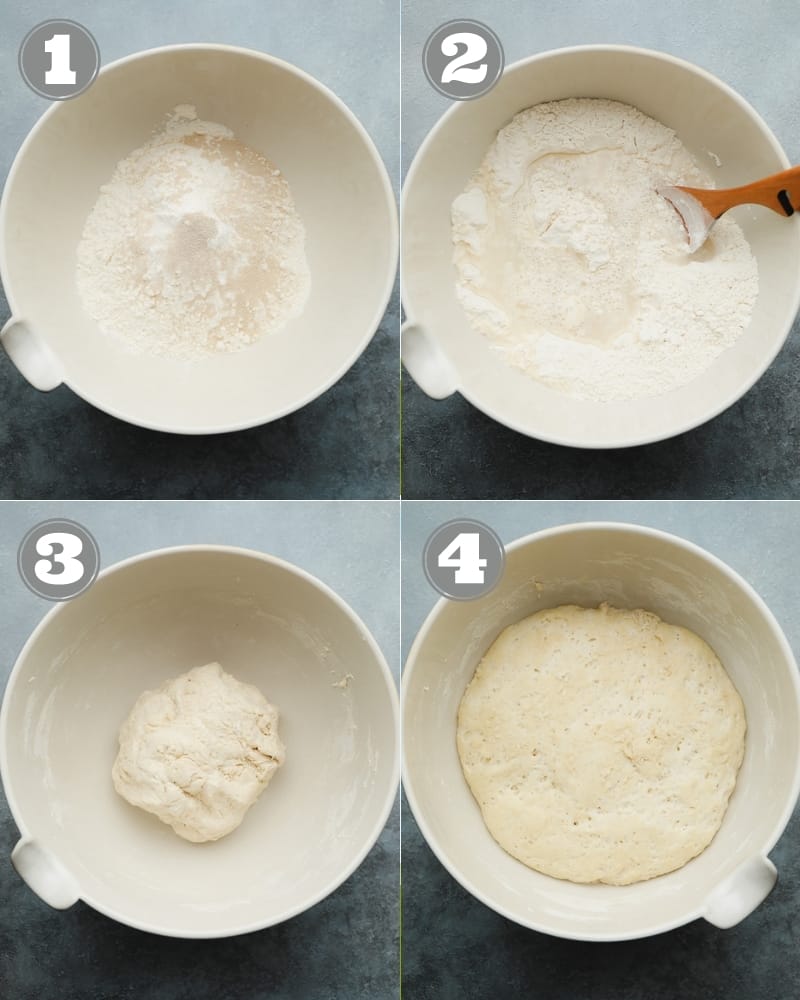
- Stir the flour, salt, and instant yeast together in a bowl.
- Pour the warm water in the middle and gently stir everything together. It’ll be quite sticky and messy.
- Cover the bowl with a clean kitchen towel and set it aside in a warm dark place to rise for 2 hours.
- After the rise time is up, check that the dough had doubled in size. It’s ready to be baked!
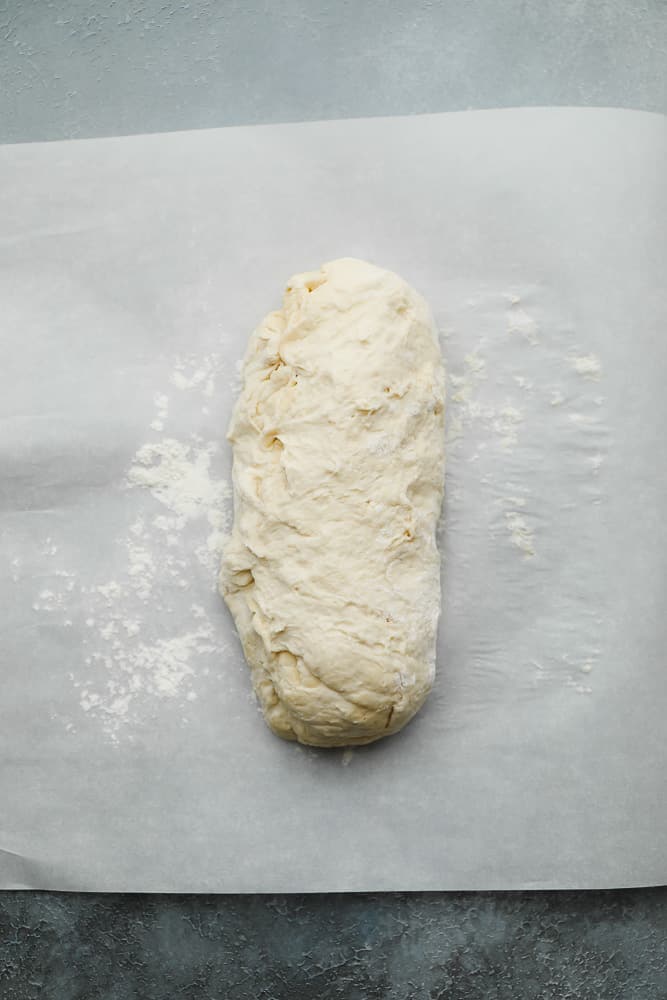
Place a square of parchment paper on the counter and sprinkle it with flour. Transfer the dough from the bowl to the paper. Sprinkle the dough with a little flour and use a spatula to gently fold the dough on top of itself about 4 to 6 times.
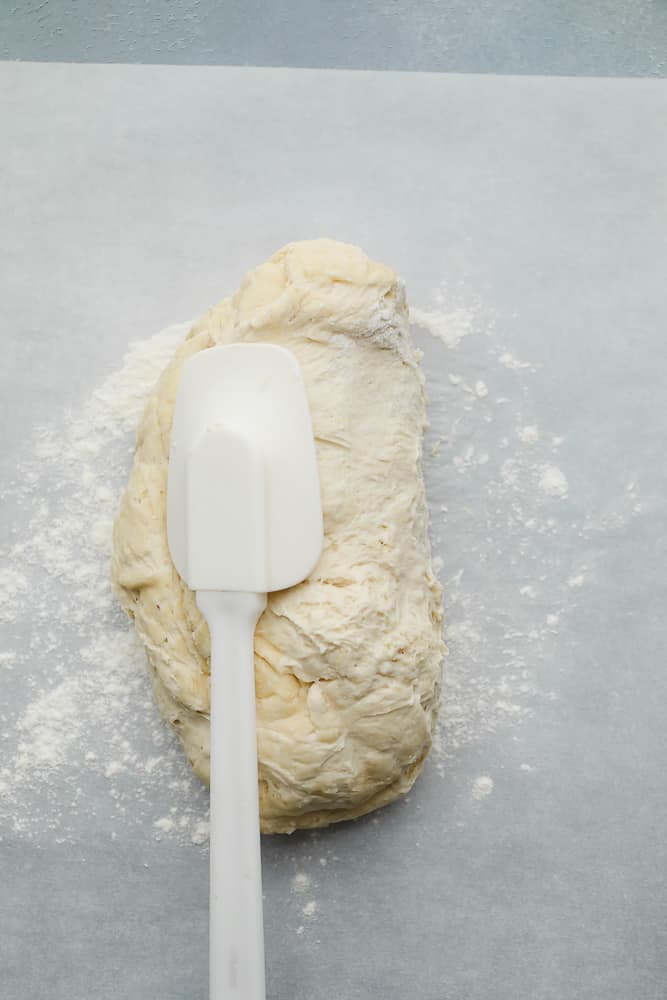
Flour your hands and gently shape the dough into a loaf shape in the middle of the paper. Or simply use the spatula to avoid touching it with your hands. It doesn’t need to be perfect!
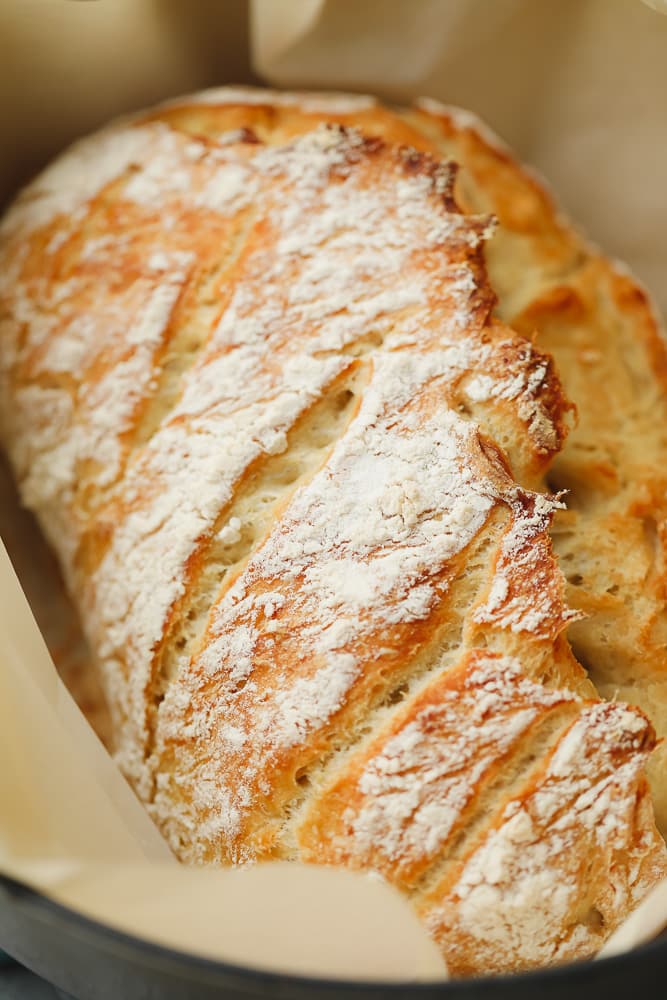
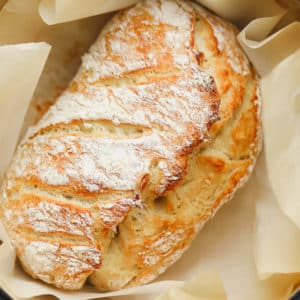
I also like to cut several lines in the bread with a sharp, serrated knife.
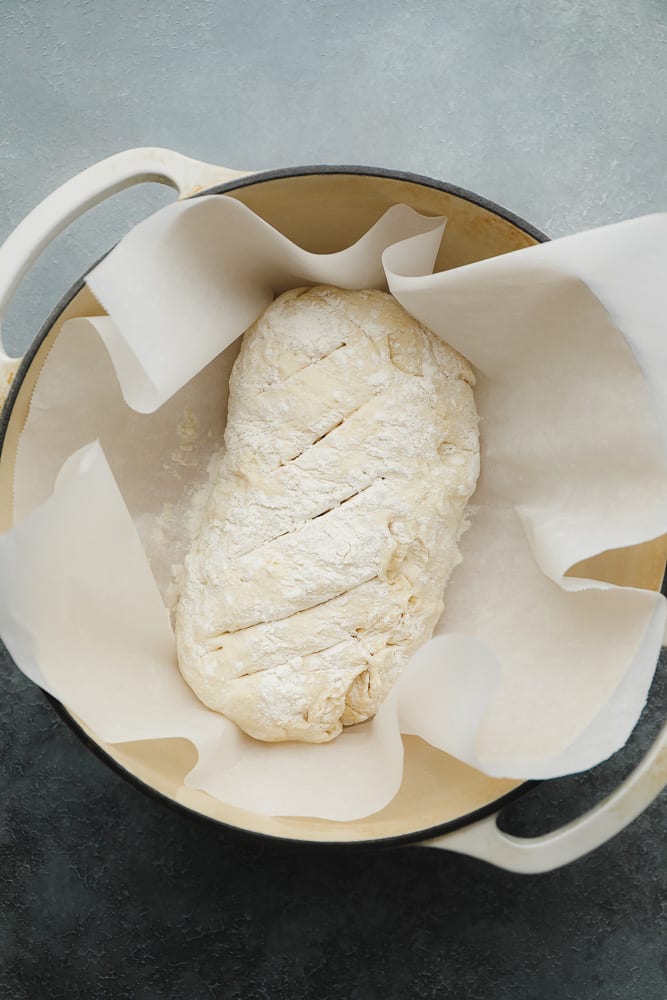
Carefully remove the hot dutch oven from the preheated oven and take off the lid. Use the parchment paper as handles to move the bread dough from the counter to the dutch oven. Place the lid back on and bake.
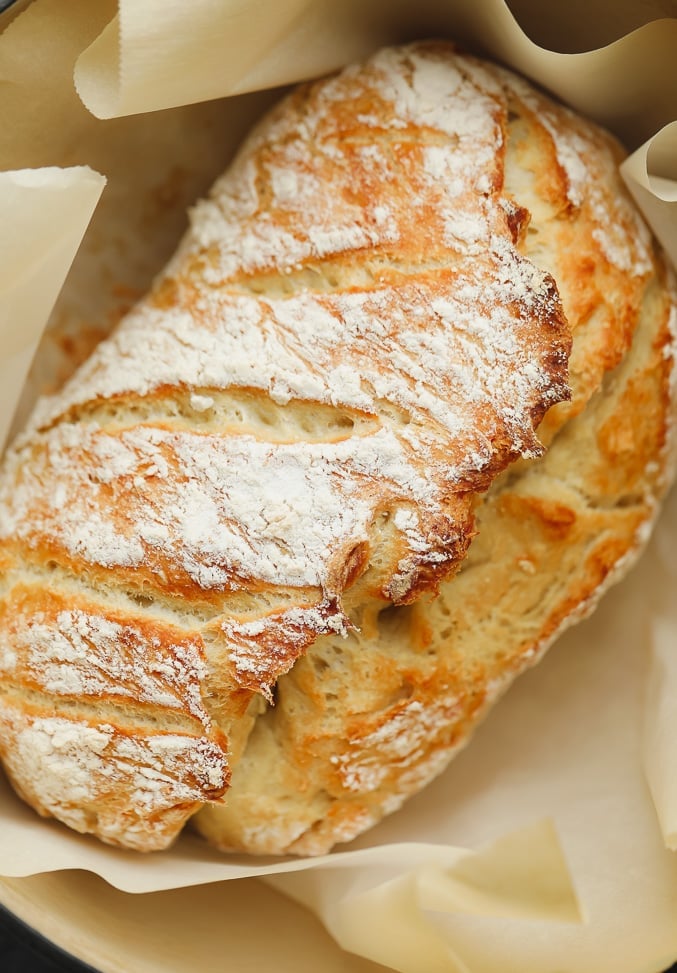
Remove the lid from the dutch oven in the last 10 or 15 minutes of the bake time. You’ll know the bread is ready when the crust is golden brown.
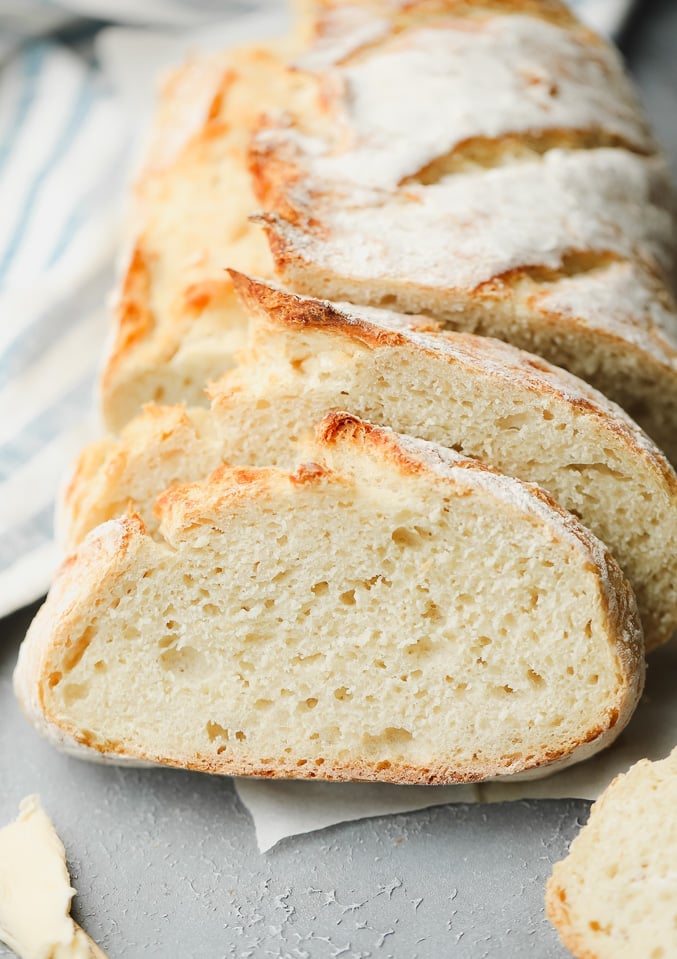
Let the dutch oven bread cool for at least 30 minutes before you slice into it. Enjoy!
Tips and variations
- Letting the dough rise – If your house is warm, the bread should be fine to rise right on the kitchen counter. On colder days, I like to preheat my oven to 200ºF and then quickly turn it off and place the bowl inside with the door cracked for about 15 minutes. Afterward, I close the oven door and continue to let it rise for the whole 2 hours.
- Shaping the dough – While this is a true no knead bread recipe, it’s still important to shape the dough with a spatula a few times so the bread can have a great structure and be easier to handle. Try not to hand it too much or it will lose those wonderful fluffy air pockets.
- Preheating the dutch oven – Don’t skip this step! The dutch oven needs to be HOT when the dough goes in to help the crust get nice and crispy. Pop it in the preheating oven about half an hour before the bread is finished rising.
- Gluten free – I haven’t tested this recipe with gluten free flour, therefore I’m unsure if it would work. Almond or oat flour will not work for this recipe.
Frequently asked questions
- What is no knead bread? In most traditional bread recipes, letting the dough rise multiple times and kneading it by hand is essential in forming the gluten. No knead bread doesn’t need to be kneaded because it’s left to rise once for a very long time. This gives the gluten plenty of time to form.
- What if you don’t have a dutch oven? You can bake no knead bread without a dutch oven but the crust won’t turn out as golden brown or crispy. Bake the dough right on a parchment-lined baking sheet or in a preheated cast iron skillet instead.
- Why didn’t my bread rise? This probably means your yeast was old or expired. I recommend starting over with fresh yeast to get the best results.
- Can you make the dough ahead of time? Absolutely! Let the dough rise for 2 hours, then bake it or wrap it in plastic and keep it in your fridge for up to 7 days.
- Is it freezer-friendly? Very much so! Wrap the whole loaf or individual slices in plastic wrap and freeze for up to 3 months. Let it thaw in the fridge or on the counter before you use it.
Serving suggestions
There are endless ways to enjoy this easy homemade bread:
- Spread some vegan butter on each slice.
- Dip it into some olive oil and balsamic vinegar.
- Use the slices for avocado toast.
- Serve it on the side of a comforting soup, like Vegan Potato Soup and Vegan Broccoli Cheese Soup.
- Spread some vegan ricotta on the bread and top it with roasted cherry tomatoes.
- Use it to make sandwiches or grilled cheese!
- Spread some garlic butter on top to serve next to Vegan Lasagna or Eggplant Parmesan.
This artisan bread also makes wonderful Vegan French Toast!
More easy yeast recipes
Dutch Oven Bread
Ingredients
- 3 cups all purpose flour
- 1 1/2 teaspoons salt
- 1 packet instant yeast ( 2 1/4 tsp)
- 1 1/2 cups warm water (not hot or it will kill the yeast)
Instructions
- In a large bowl, stir together the flour, salt and instant yeast.
- Add the warm water and stir together until a sticky dough forms. Don't worry about it looking like a round ball of dough; it will be quite messy and that is fine.
- Cover the bowl with a clean tea towel and set in a warm place to rise for 2 hours. I preheat my oven to 200 degrees F, then quickly turn it off, place the bowl inside the oven with the door cracked for about 15 minutes, then close the oven door and continue to let it rise for the whole 2 hours. If your house is warm, you can just use the counter.
- About a half hour before the rise time is done, preheat the oven to 450 degrees F (if you used your oven to help the dough rise, remove the bowl before preheating) and place your dutch oven inside the oven, with the lid on, while the oven preheats. We want the dutch oven HOT when the dough goes in! Once the oven preheats, leave it in there for another 10-15 minutes, until your dough is ready to be transferred in.
- Prepare the dough: Place a large square of parchment paper on a counter and sprinkle it with flour. Using a spatula, transfer the dough to the floured surface as one big blob.
- Sprinkle a little flour on top of the dough, and use a spatula to gently fold the dough on top of itself (see photos above in post) about 4-6 times.
- Gently shape it into a round loaf type shape in the center of the parchment paper (it doesn't have to be perfect at all), using lightly floured hands or the spatula. Be careful not to handle the dough too much or it will lose those wonderful air pockets. If desired, cut several shallow lines using a sharp, serrated knife.
- CAREFULLY remove the HOT dutch oven and remove the lid using oven mitts. Using the parchment paper, place the dough inside the dutch oven and place the lid back on. You will cook it with the parchment paper, and it's okay if a little bit sticks out of the lid.
- Place the dutch oven back in the oven and bake for 35 minutes. Remove the lid (with oven mitts!) and bake for about 10-15 minutes, until the crust is golden brown.
- Remove the dutch oven from the oven, and transfer the bread to a cutting board to cool for about 30 minutes before slicing. Enjoy!
- Keep the bread covered at room temperature for 2-3 days, or a little longer in the refrigerator. It also freezes well!
Notes
- No dutch oven? Bake the dough right on a parchment-lined baking sheet or in a preheated cast iron skillet instead. It won’t get quite as crispy on the outside, but it works.
- Make ahead option – Let the dough rise for 2 hours, then bake it or wrap it in plastic and keep it in your fridge for up to 7 days before baking.
- Freezer safe – The bread freezes well. Simply wrap it well and freeze once it’s baked and cooled. Let it thaw at room temperature before serving.
- Yeast – You can use regular active yeast, just make sure it doubles in size before baking.


Love, love, love!!
Easy peasy and delish!
I was asked by a friend who’s on a gluten free diet to bake her a bread. Have you tried making same type bread but gluten free version?
Thanks!
I’m so glad you love the bread! I haven’t tested this recipe with gluten free flour, so I’m not sure if it would work. I do know that almond or oat flour will not work for this recipe. If you try it, let me know how it works out for you!
Hi Nora, thanks for another great-looking recipe. Question: for the make-ahead method, when you say to wrap the dough in plastic, do you mean just cover the bowl with plastic wrap or take the dough out of the bowl and wrap it? Thanks again—I’ve made the dough today for baking tomorrow or the next day. It’s rising now and looking good!
Hi Lisa! I mean to literally wrap it in plastic. You could also stick the dough in a large ziplock bag, or simply cover it well in a bowl, and place in the refrigerator. Hope that helps and you enjoy the bread!
Hi Nora. FYI, after the initial rising, I left the dough in the bowl, covered, in the fridge for 2 days, and then baked it. The loaf turned out great! I had added minced garlic and rosemary when I mixed up the dough.
Hi Lisa. Wow, I’m so glad the bread turned out great! Your additions of garlic and rosemary sounds delicious! Thank you for sharing your review and feedback!
Haha, there’s more! FYI for anyone else, I made this bread again using 1/3 whole-wheat flour (125 g) and 2/3 all-purpose flour (250 g). and it turned out great—good rise and light-ish body. I also brushed the top with water before baking and sprinkled sesame seeds on and that worked well, too.
So many options. 🙂
I’m in Europe and our oven only goes to 400F. What time would you recommend for baking the bread?
400 should work, it just may take a bit longer. Hope that helps!
I was a little nervous to make bread for the first time, but this recipe is so unbelievably easy! The bread tasted wonderful. Thanks for another great recipe. I will be making this regularly.
Thank you for sharing your wonderful feedback! I am glad you found the bread both easy and delicious! Happy cooking!
Can you add herbs to the dough?
Thanks
Sure!
Hello! Could I use 1/2 whole wheat flour?
Yes, you can.
Great recipe! Bread came out so good! Thank you!
I baked this recently, adding chopped fresh rosemary and garlic, and it was delicious. If I refrigerate it next time a day or 2 ahead, do I need to bake it longer?
Thanks for all the great recipes!
Hi there, I’m glad you enjoyed it! It might need just a few extra minutes in the oven, yes.
So maybe 10 more minutes covered before uncovering for the last 15 minutes?
Thanks!
Yes, that should be about right. Thanks!
Fantastic and super easy!! Our family friend had given me a very old cast iron dutch oven used by his grandma who was a cook during cattle drives in the early 1900’s. Loved that I could use it to bake this beautiful, crusty loaf. So excited to use the rest for french toast.
Amazing!
Wow. Another winner. This was so simple but delicious results. I did not have instant yeast so I just used regular Active Yeast and it still came out well. I only let it rise for 1.5 hours because it looked like it had doubled. Must be that oven method you suggested! Thanks you, I will be making this again!
Thank you for sharing your wonderful review and comments! I’m glad the bread turned out great for you, and thrilled you’ll be making it again! Happy cooking!
We have made this, as written, several times now. It is perfect everytime. Gorgeous golden crusty loaves of tender chewy bread. Thank you for another keeper recipe! ?
Thank you, Deb! I am glad you are loving the bread, and I love your beautiful description of it! I appreciate you taking time to share your awesome review and comments!
I never tried making bread until I made this today, and it turned out FANTASTIC!! It’s so easy and looks like it belongs on a boulangerie shelf. It’s my new go-to for dinners, friends, new baby households, etc. Next time I might try adding rosemary or garlic, depending on what it’s accompanying. My only complaint is that there isn’t an option here to upload a photo, so you could see how gorgeous it is — it’s JUST like your photo (or maybe better, ha! ;). Love your recipes, Nora. Thank you!
Hi Cyndi! I love that your bread turned out fantastic, and thrilled that its your new go-to bread recipe! I also love how beautiful this bread is! Thank you bunches for sharing your wonderful review and fantastic comments! Happy cooking!
Fantastic bread!!!! My family LOVED it. It was beautiful too! Simple instructions and easy to follow directions. Came out tender on the inside with lots of air bubbles and perfectly crusty on the outside.
Hi Alice! I’m glad the bread was a hit with your family! Thank you very much for taking time to share your wonderful review and comments!
Absolutely perfect recipe! I don’t have a Dutch oven so just did it on a cookie sheet (as you noted was possible). It turned out perfectly! I want to eat the whole loaf today. Haha. Thank you!
Thanks for letting me know, I’m so happy you enjoyed it!
Simply amazing! Thank you so much for this wonderful recipe! I just was continually failing at sourdough so this is a great crusty substitute.
You’re welcome! I’m glad you love the bread! Thank you for sharing your review and comments! I appreciate you!
I don’t have a dutch oven. Can I use a large soup pot instead?
Well it has to be oven safe, which most large soup pots are not. You can just use a pan if needed, it just won’t get as crispy and crusty.
Can I substitute the flour with gluten free flour?
Sorry, I haven’t tried it so it’s hard for me to say. It might work!
Lovely recipe Nora, thanks for sharing! Perfect bread every time.
Hi Sophie! I’m glad you love the bread! Thank your for sharing your wonderful review and comments!
I just cut a piece. OMG!!! So good and so easy!!! Thank for another great recipe Nora!!!
You are welcome! I’m glad you love it! Thank you for sharing!
What size Dutch Oven did you use?
6 quart. I added to the post to include more information about which dutch oven I use. Thanks!
Hi-
Want to try this! Does it work with ww flour?
It does work, but it will be more dense and of course taste very different, like whole wheat bread. 🙂
If you find that 100% ww doesn’t come out to your liking, I’ve been using a different low-knead recipe, and I’ve found that a 50/50 standard bread flour/whole wheat flour works best for a denser bread, and 80/20 (2 1/2 C to 1/2 C for this recipe’s flour) standard bread/ww works best for still fluffy bread but with a heartier flavor.
Would I need to adjust this re pie did high altitude? 5500 ft to be exact 🙂
I don’t have much experience with high altitude baking, so I’m not sure. Hope you enjoy it if you try it!
I’m at 7,700′ and tried this recipe today. I didn’t make any changes and my loaf is perfect! Thanks for a much faster alternative to sourdough!
This is essentially the same recipe that the New York Times first published in 2006, apparently one of their most popular recipes ever. I make it three times a week, but always let the dough rise overnight. It is perfect every time.
I’ve never seen that recipe, but I’ve seen various versions all over the internet. I wonder if it started with the ny times or if they just posted their own version. Anyhow, I’m glad you’ve already been enjoying this wonderful bread!
I’ve been using the NYT recipe for a while now, and it has more steps than this: initial rise of 60 mins, then shape with an “envelope” folding method I’ve never been able to fully master, rise another 30 mins… This sounds way less hands on and I love the spatula shaping technique. I’ll try this with the next loaf I bake!
What size Dutch oven are you using?